We have developed the automatic access control functionality in Trainingym Manager so that the access devices to your facilities can be remotely controlled from Trainingym Manager, thus facilitating operation and customer service.
What content will we see in this tutorial?
- Devices
- Groups
- Access Control with QR
- Check the occupancy status of the center
- Access control linked to products
- Allow or deny turnstile access to a Member based on their file
- Allow the reset of a customer's facial identification photo
Here is the step-by-step explanation 📑
We expand the ways to control your customers' access.
Now, Trainingym also offers the possibility to view and edit the integrated devices of your center to have automatic control or manually register your clients' access to the center or the different rooms of your fitness business.
- Log in to Trainingym Manager with your login credentials.
- Locate the My Gym menu and expand it.
- Click on the "Access Control" submenu.

Devices
In this section, you will see the devices that have been linked to the sports center (the reservation tablets are not included).
For each of them, you have different options:
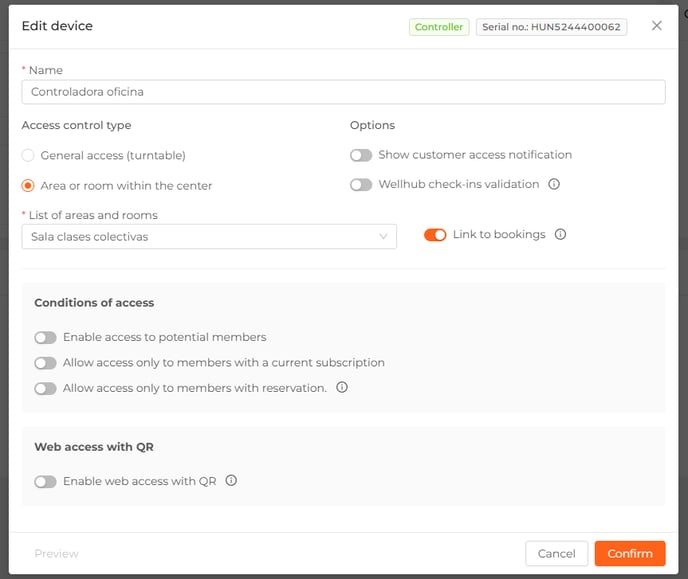
Edit device
To edit the features of a device, click on the pencil symbol ✏️ and the edit mode will open.

- Serial number: Here you can view the serial number of your controller.
- Name: Enter the name that will identify the device. This is a mandatory field. Maximum of 50 characters.
- Mark as a general access device.
- Link the device to an area or room: Allows you to link the device to an area of your gym.
Mark as a general access device
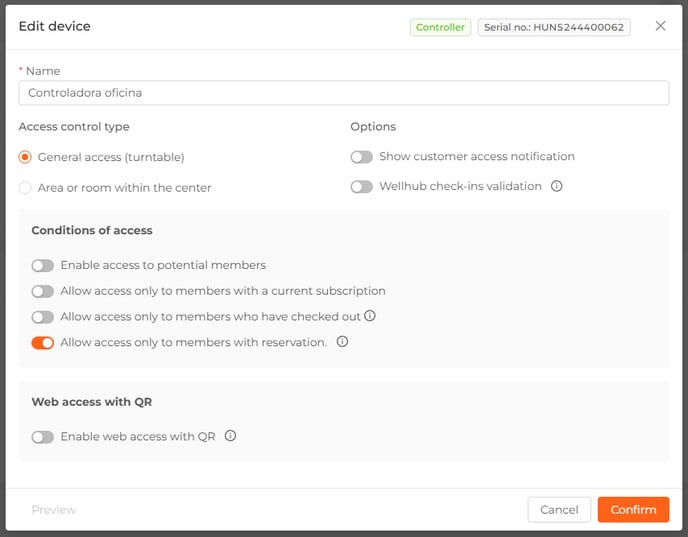
If we select the option "Mark as general access device," we can configure the device to control access to the gym.
- Allow access to potential client: if enabled, it allows potential clients to access the center (in accordance with the other settings established).

- PAllow access only to clients with a current subscription: If enabled, it will only allow access to clients who have an active rate and/or voucher.
If the member also has a rate and/or voucher linked to an access control, their access to the center will be limited to the configuration established in the corresponding product. For more information on this aspect, refer to the section Access control linked to products in this tutorial.
- Allow access only to customers who have checked out: If enabled, access will be restricted exclusively to customers who, after checking in, have subsequently checked out.
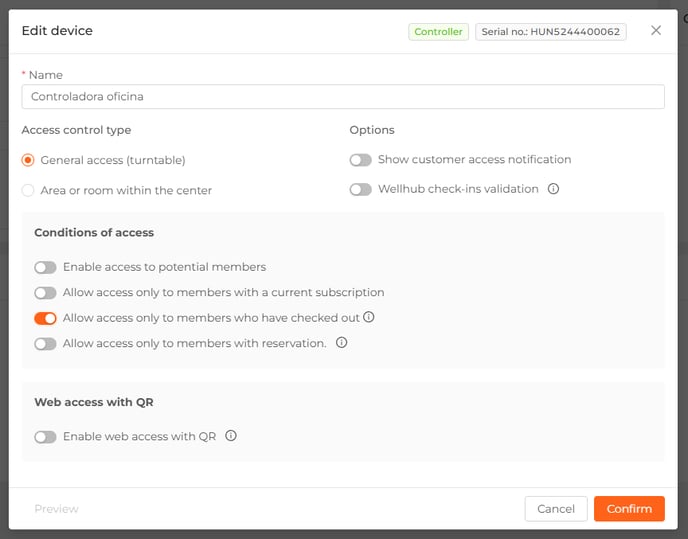
- Allow access only to clients with a reservation: If enabled, access will be restricted to members with a valid reservation. To validate the reservation, it is necessary to link the device to the reservations.
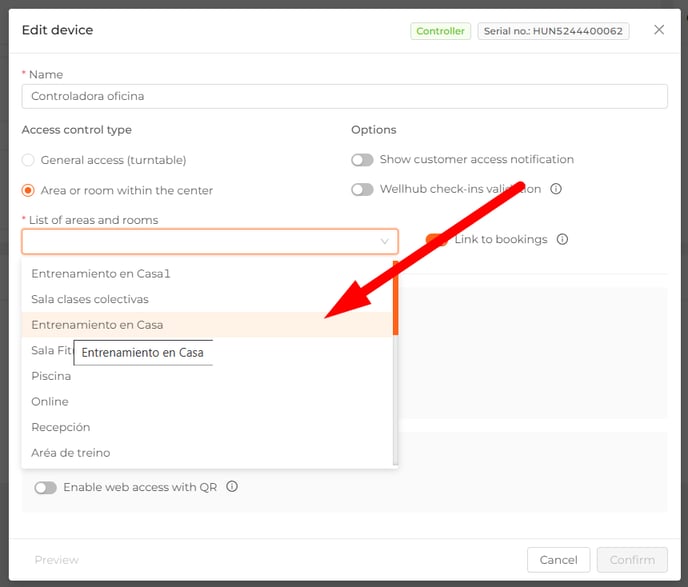
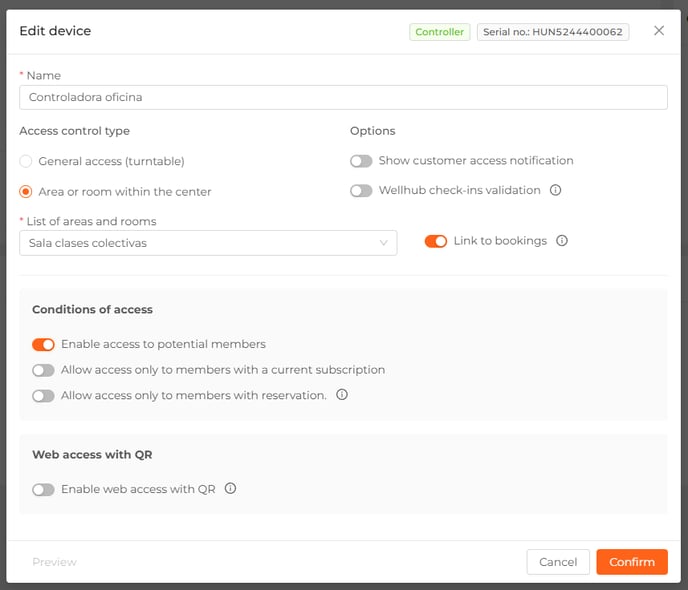
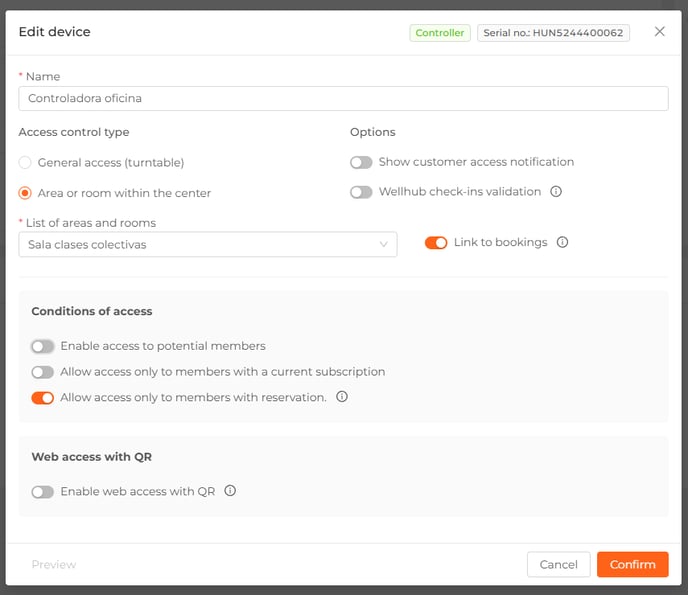
Link the device to an area or room
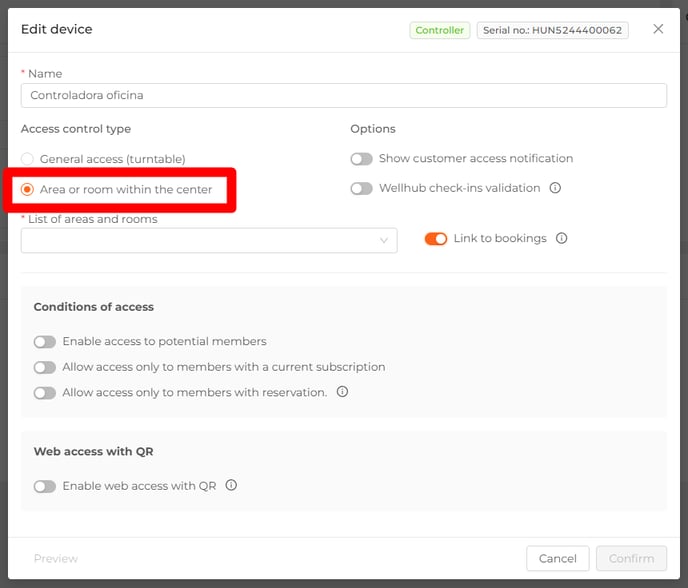
The first thing you need to do is choose the area or room to which you will link the device.
You will be able to set access conditions and link them to reservations.
- Link for reservations. Activates what we will call "reservation mode," meaning that if activated, access will be limited according to the general reservation settings, and attendance will be validated for the activities configured for the selected area or room.
- Allow access to potential clients: if enabled, it allows potential clients to access the center (according to other established settings).
- Allow access only to customers with a reservation: This will limit access exclusively to customers who have a current reservation.
It is compatible with the "Link Reservations" verification. If both options are active, only customers with a current reservation and within the time limit defined in the general reservation settings will be able to access the lounge, and the reservation will be validated.
Show customer access notification
This functionality will allow you to display pop-ups in all manager views, giving you the ability to receive notifications when a customer tries to access your business.
These notifications will inform you whether access was allowed or denied and, in case of denial, will also indicate the reason.
Want to know how the customer access notification system works?
I invite you to watch this video 👇
How to activate client access notifications
To enable this feature, simply access the Trainingym Manager, go to the My Center > Access Control menu, and click on the edit icon 🖊 of the device you want to configure.

Then, activate the option "Show client access notification." Once activated, you will be able to receive notifications about client accesses.
📌 Warning:
It is important to mention that each employee will have the ability to independently enable or disable the display of these pop-ups. This means that, even if the option is activated on a device, the pop-ups will not automatically appear, but each employee can enable this function in their employee profile.
This way, we can customize who will be able to see these notifications.

With this new feature, you will be able to track your customers' access, receiving detailed information about who tries to access, from which device, and the reason why access was denied, if necessary.

📌 Notes:
These are the reasons that may lead to denied access ❌
| Notification to the center | Notificación al cliente -> Customer notification |
| Access denied | Access denied |
| The signature does not meet the requirements | Your subscription does not meet the access requirements |
|
The device is not registered in this center |
This device is not registered in the system |
| The client does not exist in this center | You are not registered at this center. |
|
The customer does not have an active subscription. |
You need an active subscription to access. |
|
Attempt to access outside permitted hours |
You are trying to access outside the allowed hours. |
| Canceled client |
Your account has been deactivated |
|
Access disabled for potential customers |
Potential clients are not permitted access. |
|
The client access permission is disabled |
Your access permission is disabled |
|
No exit was recorded |
You must log out to be able to access again. |
|
Attempt to access without reservation |
Access is not possible without a reservation. |
|
No activities are available within the access period |
There are no activities within the access period. |
|
No cumples con los requisitos de reserva de esta actividad |
Você não atende aos requisitos de reserva desta atividade |
Remember that, to use this function, it is necessary to have the corresponding permissions, both at the device level and at the employee level.
Manual Access Log
As a fitness center staff member, you can now manually register the entry or exit of individuals (Clients/Staff/Others) from the center through the Trainingym Manager.
Choose the device you want to log in to and click on the lock 🔓.

A modal window will open where you can select some parameters.
- Select the option input or output.

- Select the person's role (Client / Employee / Other) for whom you are recording the entry or exit (required).

- Search by first name, last name, or email and select the corresponding record (required):

- If you are a client, you will be able to search in all Customer lists: Active, Potential, and Low.
- If you are an employee, you can search the asset list.
- If you select "Other," this search field will be disabled.
- Confirm or cancel the activation of the mechanism.

🚨Important:
- If a member who is a deactivated client is selected, this will be indicated as a warning to confirm or cancel access.

- If you choose a partner who is a Potential Client, and the "Allow access to potential client" button is not activated, an informational modal will appear to confirm or cancel access.

- If we select a customer who does not have an active subscription and the key corresponding to "Allow access only to customers with an active subscription" is not enabled, an informational modal will be displayed to confirm or cancel access.


- If you choose a client without a reservation, and the option "Allow access only to clients with a reservation


Groups
The Groups section allows you, if you have 2 or more devices, to create groups that include the access devices of your choice.

Add group
To add a new device group, click on "Add group".

The group creation mode will be opened.
- Name: Fill in the name that your new group will have. Maximum of 50 characters (required)
- Group color: This will identify the color of the group in the group list.
- Image: You can assign an image to identify the group.
- Device linking: Choose from the dropdown list how many devices you want to assign to the group.
-
- Choose the different devices you want to add.
-
 Click on ➕ Add devices.

Click "Confirm" to add a new group or "Cancel" if you want to exit the group creation mode without saving.

Your new group of devices is now available, with the color and image of your choice.

Edit group
To edit an already created group of devices, click on the pencil ✏️ and the editing mode will open.

Make the desired modifications and Confirm / Cancel to apply or discard the changes.

Delete group
To delete a group, click on the trash can 🗑️.

🚨Important!
If you try to delete a group that is linked to a product's access control, an information pop-up will be displayed.

Para obter mais informações sobre o controle de acesso vinculado a produtos, consulte a seção relevante deste tutorial.
🔍The "Groups" section will only be available if your fitness company has at least two integrated access devices; otherwise, this section will remain hidden.
Access control by QR
Trainingym allows you to register members' access to any area of your sports center, even if no integrated devices are available. With this functionality linked to the configuration of total capacity and the different areas of the center, we ensure something essential: operating without exceeding the maximum allowed capacity under any circumstances.- QR scanning through the Trainingym Manager
- QR scanning through the Webapp Staff
🚨 Important!
The QR of each member:
- It cannot be shared as it does not allow screenshots.
- It is dynamic and updated every 10 minutes.
In this article, we will explain how to do this step by step using the first of the options mentioned above.
Log in to the Trainingym Manager with your employee username and password. Then, go to the My Gym menu > Access Control and click the Open Web Control button.
Remember that you can configure your "occupancy traffic light" so that the Web occupancy view screen shown in the app and on the Web reflects the occupancy status differentiated by 3 colors, as explained in this other article.
After clicking on Open web control, a new browser tab will open, where we must select the area or space of the center in which we want to register the entries and/or exits.
After the area and type of registration are selected, a screen will be displayed where members can enter their personal QR code to register access or exit the chosen space.

🚨Important!
Remember that granting or denying access may depend on whether the member has made a reservation for one of the activities if the "Allow access only to clients with a reservation" option is enabled in the Settings tab, to the left of the "Open control web" button.


If this option is enabled, it will only allow access to a client who scans their QR code within the permitted access window for an activity they have previously booked. Otherwise, access will be denied.


If all conditions are met to allow customer access, scanning the QR code should grant the customer proper access.Caso todas as condições sejam atendidas para permitir o acesso do cliente, a leitura do código QR deve permitir o acesso correto do cliente.
Important: The QR registration of a client's access to the center or a room from the control site does not imply the validation of their reservation. Access to this activity must be registered independently through the channels available in the tool (QR, proximity device, check-in on the Staff Webapp, QR reader on an integrated device, etc.).
Mark exit from the center
All clients who register their entry automatically appear in the menu Capacity > Occupancy Status in Trainingym Manager. We have three options to register their exit from the center:- Open the control web and select "Register the exit," then have the member scan their QR code again upon leaving.
- Manually register the client's departure from the center on the same occupancy status screen.
- Ask an employee to scan the member's QR code in the team's Staff web app. (+ details in this article).

Mark Gym Exit
All members who check in automatically appear in the Capacity > Control menu in trainingym Manager. We have 3 options to check outside the center:
- Open the web exit control and have the client scan their QR code again when leaving.
- Manually log the client's gym exit from the same screen.
- Let an employee scan the client's QR code from the Staff Login.(+ details in this article)

Check the occupancy status of the center
Remember that the state's colors depend on the occupancy state definitions, as explained in detail here.another article. Just like the Trainingym Manager, you can activate direct access to the occupancy status directly from the Trainingym application.

☝🧐 Attention! It automatically appears in the Trainingym Staff application, but for it to appear in the members' application, it must be activated by configuring the HOME menu of the application as explained here. another article.

Visualization of Webapp Staff Occupancy Status
Types of access
In My Academy/Gym > Capacity > Occupancy Status, you can check the clients currently in the center and their type of access.

- If the access device that was manually activated is linked to a specific area or room, the client to whom you manually granted access will also appear in the occupancy status of the room in question; otherwise, they will only appear in the "real-time center occupancy" listing.
- We added a new column to the customer list at the center that will display the "Type of Access".
- Manual: If access has been granted manually from a device by clicking on the lock 🔓 and logging the access.
- Automatic: If the client has logged in through a turnstile on their own or by scanning their QR code on the control web.
Check the customer's card access
Types of access:
- Manual entry
- Lathe entry
- QR entry

Check the accesses in the employee's record

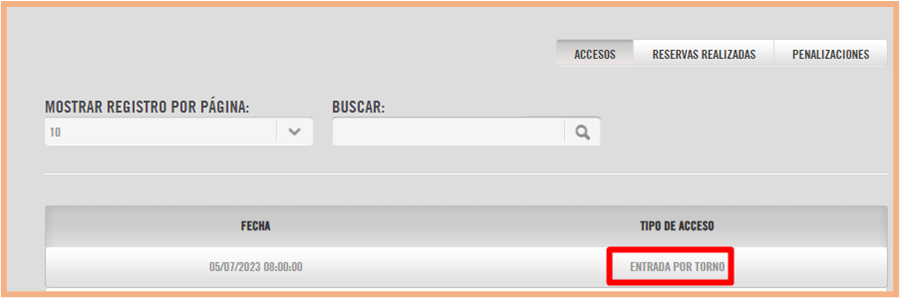
Check center access through Access Reports
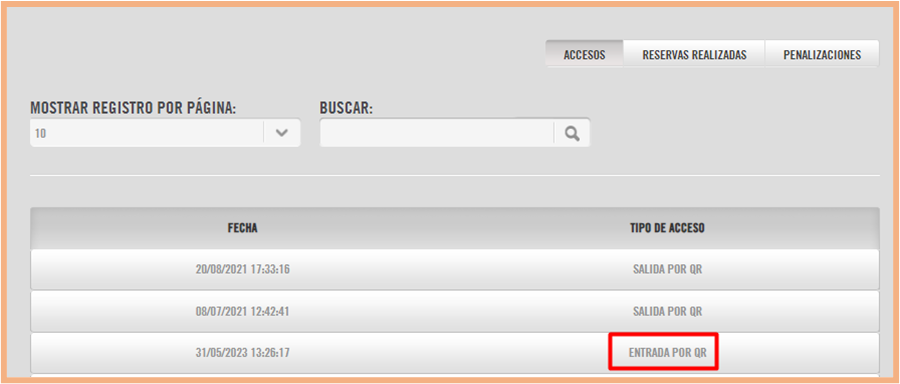
In Reports > Academy > Access, you can review center access and the type of access in each case.
Access control linked to products
Trainingym now allows you to set business rules for access devices.
In the Payments menu, for each product generated, it will be possible to define a series of conditions linked to one or more devices.
We include 3 types of products (tariff, bonus, and product), of which the "Access Control" tab will only be available for tariffs and bonuses, as products are considered physical or digital goods that customers can purchase but do not have an associated tariff/bonus.
Choose an already created rate or voucher, click on it, and look for the "Access Control" tab.


Linking devices or groups of devices:
You can link your product to one or multiple devices, as well as to groups of devices.
Click on the dropdown menu Devices or Groups and add the desired devices.


Access limit
It is possible to set one or more time intervals for your product (during which the device(s) selected in the previous section will be activated).- Select the desired day or days.
- Enter a start time.
- Enter an end time.
- Click on ➕ Add timetable.

Now you have your first track created.
If you wish to add more tracks, repeat the process as many times as you like, adjusting the tracks of your product.
You can delete a track already added by clicking on the trash can 🗑️

Press 💾 Save when you finish editing your rate or voucher to apply the changes.

The devices linked to this product will only be activated in the ranges you have configured on them.
It will apply to all customers who have a subscription to this rate or bonus.
🔍If an access device is not associated with any product, it will only be validated:
- The Partner's status (Active or Potential, if applicable).
- That it does not have a registered access without exit.
- If it has a reservation, when configured for such.
If an access device is associated with a product, it will also validate whether the Partner has it assigned and active.
🚨Important!
You can only set these conditions if you have at least one access device configured; otherwise, the options will remain hidden.
⚠️ Attention!
If a product has a device/group linked with a time restriction, only the customers who purchased that product will have this time restriction.
Allow or deny turnstile access to a Member based on their file
Now you can enable or disable the ability to activate any access device from your customer's profile.
Go to a customer's profile, in the Data tab, and look for the "Allow access" option.

🔍If the option is disabled, it will override any other settings we define in Products or Access Control, so the customer will not be able to access it through any of the integrated devices.
🚨Important!
This option affects only access through integrated devices, not those that can be registered via QR through the control web.
Allow the reset of a customer's facial identification photo
From a client's record, you have a new option: "Allow the alteration of the facial identification photo".These are the conditions under which a customer can reset their facial ID if your center has activated the facial recognition module and has a reader linked to integrated devices.
- The Client may reset their ID once every 30 days.
- To reset the ID more than once, it will be necessary to enable the option "Allow facial ID photo change" in Trainingym Manager.
-
- If the option is disabled and it has not been 30 days since the last photo update, the reset option will not be displayed in the app.
- If the option is disabled and 30 days have passed, the option to reset the photo in the app will be displayed.
- If the option is enabled and the photo is updated through the app, the option in Trainingym Manager will be disabled, and the 30-day counter will be reset. The reset option is displayed in the app and remains hidden when the photo is taken.
- If it is the first time the photo is taken, the 30-day timer is activated.
- If the photo is taken from the Manager, the timer will be activated.