All company processes, products, and services must be developed with the customers and their needs in mind.
The foundation of our business is our customers. This is known as customer-centricity.
In the case of fitness businesses, there is a particular aspect: the relationship with users is—or we intend it to be—long and stable. In this context, knowledge and learning is a continuous process.
To analyze this rationally, we refer to the "customer's decisive moments": the instances when the relationship is tested. Examples of this can be when the user hasn't trained for a long time, when they find the facilities too crowded, or when they feel their progress is stagnating...
Source: The Customer Lifecycle: A Comprehensive Perspective on User Relationship.
Although their popularity is more due to the categorization of trending topics on Twitter and Instagram, hashtags can be an excellent way to segment your customer database based on indicators that later guide follow-up and loyalty actions.
In this article, we show you how to harness the full potential of #hashtags and filters in Trainingym Manager to enhance client tracking.
What content will we cover in this tutorial?
1. KPI dashboard with relevant performance indicators
2. Client search and information in the list
3. Hashtags and Filters for Segmenting Your Customer Database
4. Export customer list to Excel
5. Multiple Editing Options
We explain everything step by step.
First, log in to Trainingym Manager with your username and password. The New Member Menu will be available in the list of active, potential, and inactive members.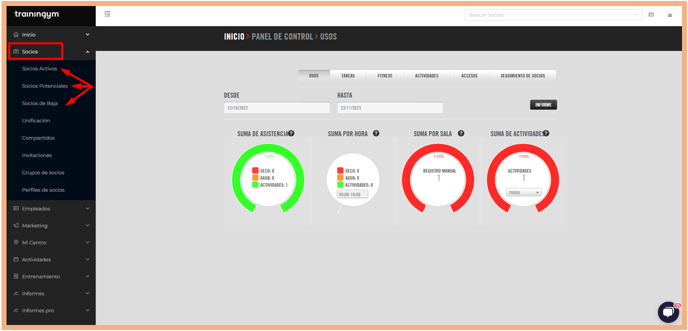
Let's focus, for example, on the list of Active Members to analyze all the new features it includes.
1. KPI Dashboard with Relevant Performance Indicators
As a new feature, we have included a New KPI Dashboard with performance indicators related to specific customer behaviors that are key to their loyalty process.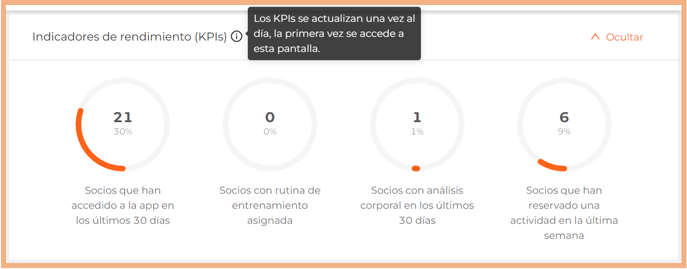
- Members who have accessed the app in the last 30 days. By access, we mean a client login to the app.
- Members with an assigned training routine. The training plan must be active.
- Members with body analysis in the last 30 days. This includes weigh-ins conducted by the client using the app with Trainingym Balance, as well as assessments made with other models of scales integrated with Trainingym. Examples: Tanita BC-1000.
- Members who have booked an activity in the last week. Counts class reservations made in the past 7 days.
📌 The number in bold at the top of each KPI indicates the number of clients who meet that condition. The % refers to the percentage of clients who meet that condition relative to the total number of active members.
The data for these indicators is updated every 24 hours, specifically the first time the screen is accessed each day.
💡 Use the "Hide" option to collapse the view of performance KPIs, allowing more screen space for the customer list.
2. Search and customer information in the list
Use the search field to find any customer in your business by first name, last name, phone number, or email.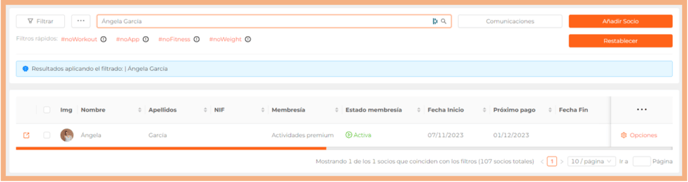
💡 For a quick search, we recommend using the search bar located in the top banner.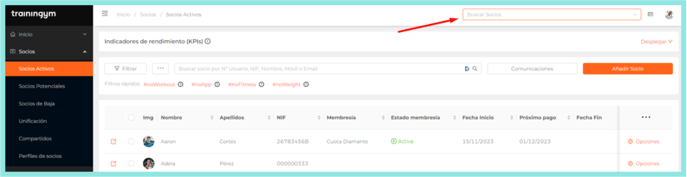
The visible information for each client from the list itself is editable. We allow you to choose from the available columns through the following option.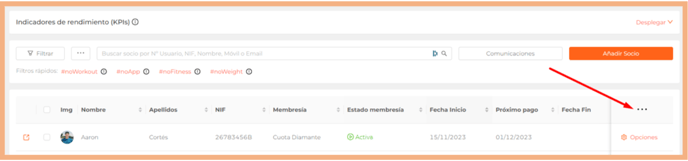
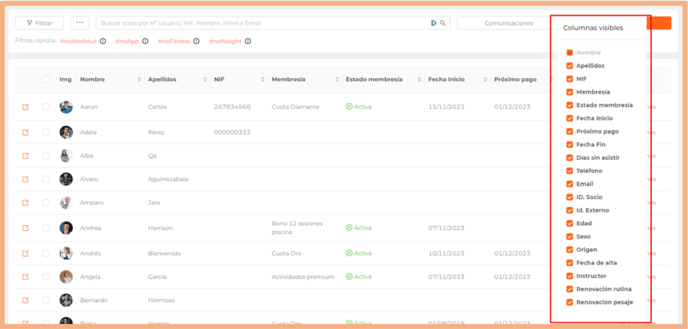
👉 The available columns are as follows:
- CTA to open the customer profile in a new tab.

- Image: If the client does not have a photo in their profile, their initials will be displayed.
- First Name: Client's first name.
- Last Name: Client's last name.
- NIF: Client's tax identification number.
- Membership: "Essential" fee that the client may have contracted. 🆕
- Membership Status: Active / Free Trial / Scheduled / Cancellation Requested / Canceled / Unpaid / Expired. 🆕
- Start Date. Membership commencement date. 🆕
- Next payment. 🆕
- Subscription End Date. 🆕
- Days Without Attending: Refers to the number of days the client has not accessed the center (access controlled by turnstile) and/or any of the Trainingym platforms.
🔍 The "Days Without Attending" data for the client is determined by the configuration set from the menu My Center > Data > Settings > Access Types (Days Without Access).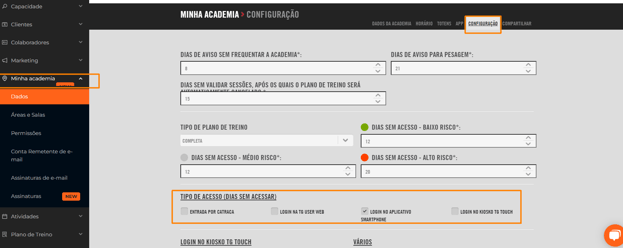
We can consider the following types of access when calculating the "Days without client attendance" data:
- Turnstile entry.
- Web login for Trainingym User (www.tguser.com).
- Login on smartphone app.
- Login at Trainingym Touch kiosk.
👉 If we select multiple options, the most recent access recorded from any of the selected access types will be considered.
- Phone. Customer's mobile phone.
- Email. Customer's email address.
- ID. Member. Customer identifier in Trainingym. It may not match the customer's identifier (number) in your fitness business CRM.
- ID. External. Customer identifier in your fitness business CRM.
- ID. Wellhub. Member identifier in Wellhub.
- ID. TotalPass. Member identifier in TotalPass.
- Age. Customer's age.
- Gender. Customer's gender.
- Source. Where the customer's profile was created. Manual entry (Manager) / App (Register tab) / CRM Integration / Excel Import / Rewards (Invitation) / Web Easy (Registration).
- Registration date. Customer's registration date.
- Origin center. For multi-center members, indicates the center where the registration occurred.
- Instructor. Employee related to the customer. From the customer's profile, through the "Relationships" section, we can view and edit the employee or employees related to a customer.
- Fitness goal. Indicates the fitness goal associated with the member's training plan.
- Routine renewal. Refers to the date of renewal for the training plan assigned to the customer.
- Weigh-in renewal date. Refers to the date when the customer should re-measure their body composition data (weigh-in).
📌The "Weighing Renewal" date is determined by 2 aspects:
1. Ensure that the weighing task is set up with the "Automatic Renewal" option. This option is available from the menu Employees > Categories > Fitness > Tasks > Weighing.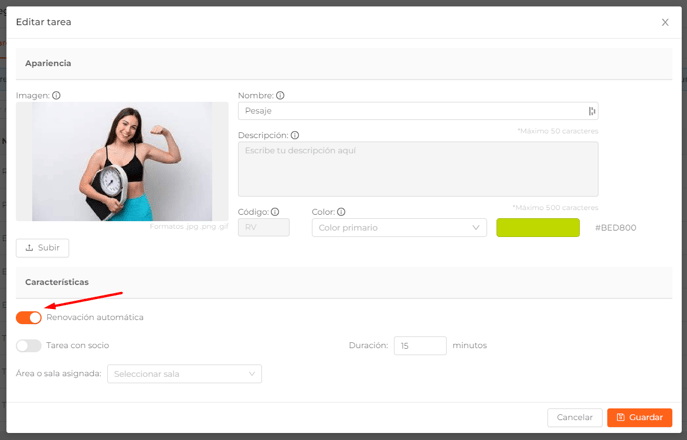
2. If the previous option is enabled, the "Date for new weighing" will depend on the settings established from the menu My Center > Data > Settings > Days to remind for weighing.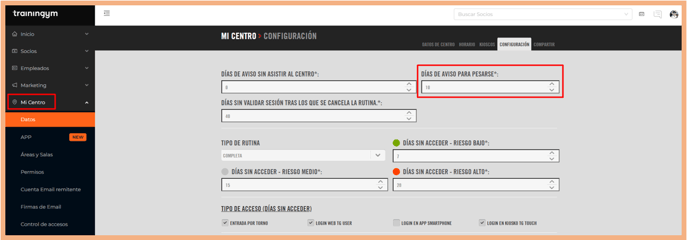
👉 Weigh-ins done by customers through the app using the Balance BT and Balance PRO by Trainingym scales will NOT generate a "Next Weigh-in Date."
- Last Weigh-in Date: Refers to the date when the client last weighed in.
- Cancellation Date: The date when the member became inactive.
- Score: Displays the member's loyalty score.
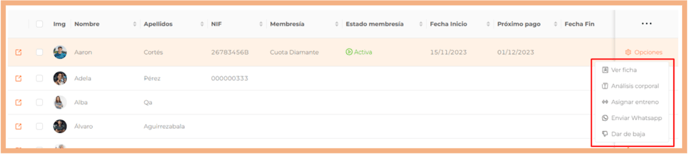
Through the ⚙️ "Options" you can:
- View Profile. Allows you to access the "Personal Data" section in the client's profile.
- Body Analysis. Allows you to access the "Analysis" section in the client's profile to perform a weigh-in.
- Assign Training. Allows you to access the "Training" section in the client's profile to assign a training plan.
- Send WhatsApp. Redirects you to the WhatsApp app so you can communicate with them.
- Deactivate. Allows you to deactivate the client. Available for Active and Potential members.
- Activate. Allows you to activate the client. Available for Potential and Inactive members.
🚨 These shortcuts are controlled by employee permission.
If you want to create a new client, simply click on the "Add Partner" button and fill in the client's personal information on the corresponding screen.
3. Hashtags and Filters to Segment Your Customer Database
Click the "Filter" and "Show More" buttons to access all available filters and hashtags that will allow you to segment your customer database.

💡 Use "Quick Filters" to segment your customer database based on behaviors that directly impact their loyalty process:
- #noWorkout: Shows only clients without assigned workouts.
- #noApp: Shows only clients who have not accessed the app.
- #noFitness: Shows only clients who have not validated a workout session via the app/web in the last 7 days.
- #noWeight: Shows only clients without recorded weight.
👉 Next, we will analyze each of the available hashtags:
- #noWorkout: Shows only clients without an assigned workout.
- #workout: Shows only clients with an assigned workout.
- #active: Shows only clients who have trained in the last 30 days.
- #email: Shows only clients with a registered email in their profile.
- #noEmail: Shows only clients without an email.
- #lastweek: Shows only clients who visited your business in the last 7 days.
- #task: Shows only clients with assigned tasks.
- #noStaff: Shows only clients without an assigned trainer.
- #noGroup: Shows only clients without an assigned group.
- #noApp: Shows only clients who have not accessed the app.
- #app: Shows only clients who have accessed the app in the last 30 days.
- #noActive: Shows only clients who have not attended activities in the last 30 days.
- #noFitness: Shows only clients who have not validated a training session via the app/web in the last 7 days.
- #expiredWorkout: Shows only clients whose workout routine has expired.
- #noWeight: Shows only clients without a recorded weight.
- #noVo2: Shows only clients without a registered VO2 test.
- #noStrength: Shows only clients without a registered strength test.
- #promoters: Shows clients who are "promoters" based on the NPS survey.
- #passives: Shows clients who are "passives" based on the NPS survey.
- #detractors: Shows clients who are "detractors" based on the NPS survey.
- #whoisin: Shows only clients who are in the facility (last 2 hours).
- #noProfile: Shows only clients without an assigned profile.
Once the required hashtag or hashtags are selected, the database will automatically filter, displaying only the clients that meet the established criteria.
Here's an example where we've used the hashtags #noapp and #noworkout to identify clients who haven't been assigned a workout routine and haven't accessed the app in the last 30 days. This offers us an intriguing segmentation of clients to whom we could send a communication to try to engage them and offer a service they have yet to enjoy.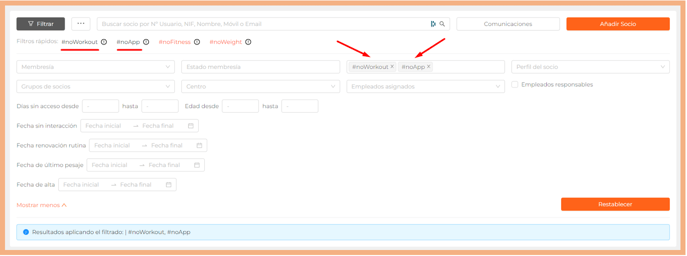
👉 In addition to the hashtags mentioned earlier, we offer you the following "Filters" to assist you in your search and segmentation process.
- Membership. 🆕 If the Payments module is activated, this dropdown will only show products with the "Membership" checkbox active. You can also filter by customers who have never been assigned a membership by selecting the "No membership" option.
- Membership Status. 🆕 Displays the different statuses a subscription can have: Active / Scheduled / Free Trial / Cancellation Requested / Canceled / Expired.
- Partner Profile Displays customers who have the selected profile or profiles.
- Partner Groups. Displays the clients associated with the selected group or groups.
- Center. If your center belongs to a group of centers where members are cloned upon creation, you can select the center or centers you wish to consult.
- Assigned employees. Displays the clients associated with the selected employee or employees. If you check the "Responsible Employees" box, only the clients whose responsible employees are among the selected ones will be shown.
- Fitness goal. It will display clients based on the selected fitness goal or goals.
- Origin of the member. You can filter based on the source of the member's profile.
- Days Without Access: Displays clients who have not logged in within the specified range of days. The "Days Without Attending" data for the client is determined by the settings configured from the menu My Center > Data > Settings > Access Types (Days Without Access).
- Age. Displays customers whose age falls within the specified age range.
- Loyalty Score. Displays customers based on the entered score data.
- Date without interaction. Displays clients who have NOT interacted with an employee within the specified date range. Examples of interaction include assigning a routine, conducting a weigh-in, or performing a strength test.
- Routine Renewal Date. Displays clients whose estimated routine renewal date falls within the selected date range. The renewal date is calculated based on the assignment day and the duration of the routine.
- Weigh-in Renewal Date. Displays clients whose weigh-in renewal date falls within the selected date range. The weigh-in renewal period is configured from the menu My Center > Data > Settings > Days of notice for weigh-in.
🚨 Important!
The weigh-ins conducted by the user through the app (Trainingym Balance Scale and Trainingym BalancePro) do not create a weigh-in renewal task in any employee's schedule. Therefore, these users will not appear in the "Weigh-in Date" filter.
- Last Weigh-in Date: Displays customers based on the date of their last weigh-in.
- Registration Date: Displays customers whose registration date falls within the selected date range. The registration date can be the date the member was created in Trainingym Manager, registered on the web/app, or synchronized with your CRM in case of integration.
- Cancellation Date: Displays customers whose cancellation date falls within the selected date range.
💡You can use more than one filter at a time, and they are cumulative. Click on them to activate and click again to deactivate. You can also use the "Reset" button to remove the selected filters.
Here is an example where we combine the #hashtag #noWeight (members without recorded weight) with the Registration Date filter to view only members without weighing who were registered between the selected dates.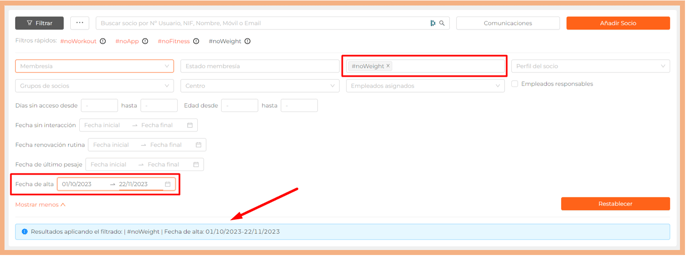
Filtering the database provides us with very relevant information, but the important thing is to take action based on the data obtained. For this reason, we include the "Communications" button, from which you can directly access the desired type of communication in the Marketing menu.
Choose between "Send SMS," "Send Email," and "Send Push Notifications."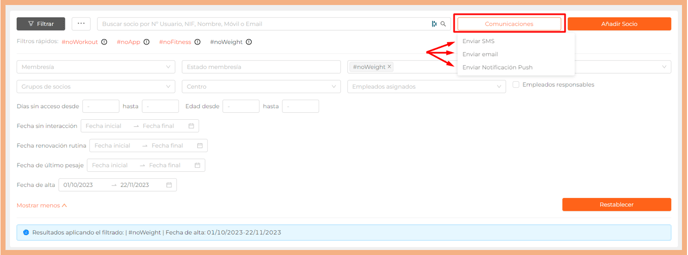
🚨 Important!
By clicking on the desired type of communication, you will be redirected to the corresponding menu in the Marketing section, but potential partners will not be included until filtered through hashtags or filters.
💡 Alternative:
Alternatively, you can export a list of clients with the selected filters and hashtags, allowing you to later include the desired clients as recipients for sending SMS, emails, or push notifications.
4. Export customer list to Excel
👉 This feature allows you to export your customer list in Excel (.xlsx) format. The exported list will consider any applied filters and/or hashtags (if any). To do this, simply click the "Export List" button.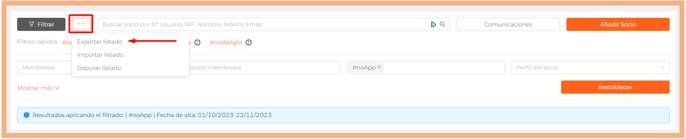
In a few seconds, your list of clients will be available in Excel.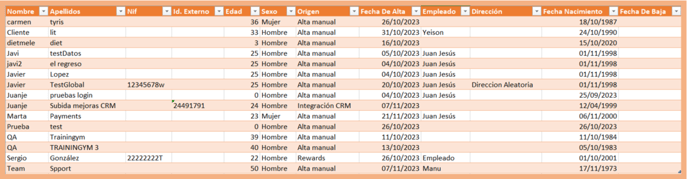
📌 In the exported Excel, all available information for each client will appear in every column, regardless of which ones you have selected.
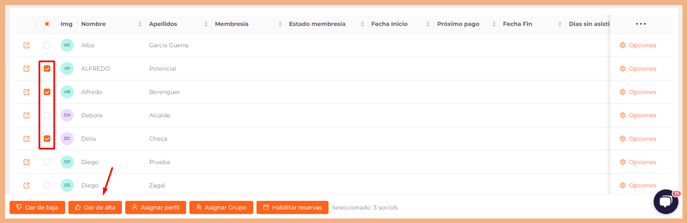
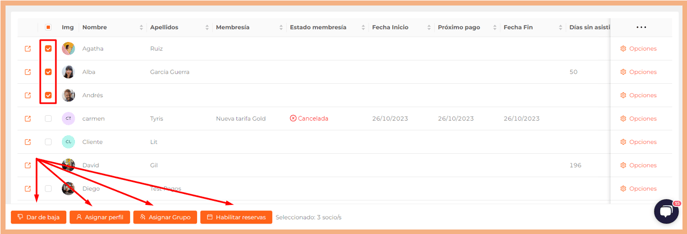
5. Opciones de edición múltiple
👉 As a new feature, we have added the ability to perform certain actions from the member list using "Bulk Edit," which streamlines your daily tasks. Let's take a look at what these actions are:
- Multiple deactivation of active or potential clients. You can select one, several, or all clients from the list, and then click on the 👎 icon to deactivate.
- Multiple assignment of "Profile" and "Customer Group." You can select one, several, or all customers from the list, and then click to assign one of the profiles and/or groups created from the dropdown menu.
- Mass Activation/Deactivation of "Reservations" for active or potential clients. You can select one, several, or all clients from the list, and then click on the "Reservations" dropdown menu, where you will find the "Activated/Deactivated" option.
- Multiple customer deletions. You can select one, several, or all customers from the list, and then click on the 🗑️ Delete icon.
- Bulk activation and deactivation of potential clients. You can select one, several, or all clients from the list, and then click the 👍 icon to activate.