Through our gamification module, you can enhance customer acquisition in your fitness business with an ambassador program for your clients and reward them for it. 💫
The operation of this system is based on allowing fitness members and employees to accumulate points, which can be redeemed for rewards.
What content will we cover in this tutorial?
3. Invitations5. Check KPI's Trainingym Rewards
6. What will your customers see on their first access after activating Rewards?
7. Have you received a free trial invitation to a sports center and don't know what to do?
8. Trainingym Rewards for employees. Discover it!
We explain everything to you step by step. 📝
1. Configuration of Trainingym Rewards®
First, log in to Trainingym Manager with your username and password, then select Trainingym Rewards > Settings from the menu.
🚨 Important!
If you do not have the Loyalty Menu > Trainingym Rewards enabled, it is because your permission does not have this option activated. In this case, you should inform your center's administrator.
(Learn how to configure permissions for your employees)👉🏻 AQUÍ)

Through the settings, you can activate, deactivate, and configure Trainingym Rewards®.
🔹 Activate and deactivate 🚨
- If the module is activated, everything related to it will appear to members in their app, and for employees, access to the Trainingym Rewards® menu will depend on the configured permissions.
- If disabled, everything related to it will disappear for your app partners and in Trainingym Manager for employees.
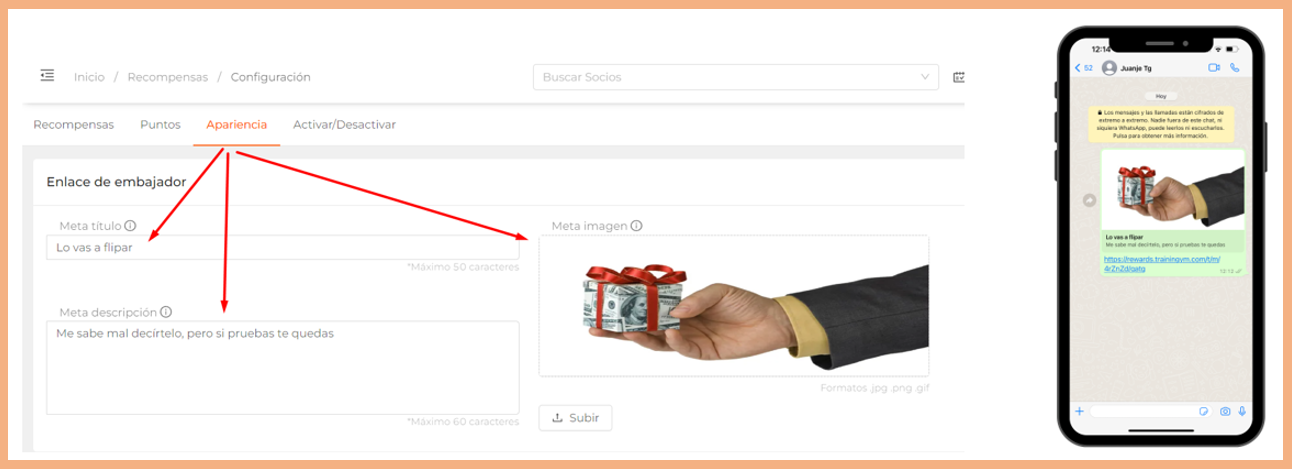
🔹 Appearance.
Customize the ambassador link information:
- Title. Maximum 50 characters.
- Description. Maximum 500 characters.
- Image. Supports .jpg, .png, .gif formats.
🔹 Point Settings
From the Points Settings section, I can activate, deactivate, and configure 4 sections:

-
Enable / Disable "Partner Module":
-
If the module is activated, everything related to it will appear to members in their app.
- If it is deactivated, everything related to it will disappear for members from their app.
- Welcome Gift. Members will receive X points as a welcome gift.
- Ambassador Program. You can set up the points and benefits for the ambassador:
-
-
Points per test. If a test request is registered through an ambassador partner link and is validated, they will earn X points.
-
Points for new sign-ups. If a new member registers through a recommendation and it is validated, the ambassador member will earn X points.
- Limit the trials that can be redeemed with an ambassador link, either by quantity or by resetting the monthly amount (the counter for the number of redeemable trials will reset each month).
-
- Training. You will be able to set the criteria by which members earn points related to their training.
-
AActivities. Each time you register your attendance at an activity.
-
Training. Each time you validate a session of your routine or validate an assigned Workout.
-
Virtual. Each time you validate a virtual class.
-
Daily points limit. You can set a maximum limit of points per calendar day that your members can earn.
- Experience surveys. You will be able to set the criteria by which members earn points related to their feedback in satisfaction surveys for activities, services, and NPS (more info).👉🏻 HERE), Similarly, establish a maximum limit of points per calendar day that your members can earn.
💥Los módulos se podrán activar por separado, de forma que:
-
By deactivating the entire ambassador program, that section of the app will disappear, and it will no longer be possible to share the ambassador URL.
-
If I only have the ambassador program active, but not the options for rewards based on trials or sign-ups, the share URL link will still be displayed and "trials and sign-ups" will still be recorded, but these will not result in any point movements.
-
If I have the ambassador program, as well as points for tests and/or activations, the points will be added based on the activated method and its configuration.
- Access and experience evaluation
Now customers can earn points for attending the center and rating their experience there.
You have two independent switches to control each of these features.
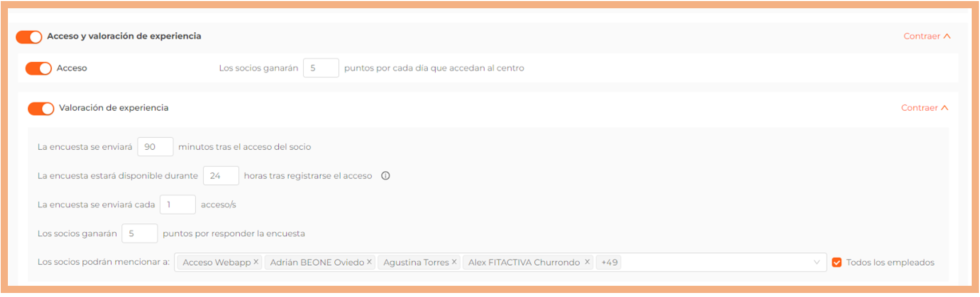
Access
It allows you to set the number of points customers will earn each time they access the center using the access turnstile or by scanning a QR code through the app or website.

Experience Rating
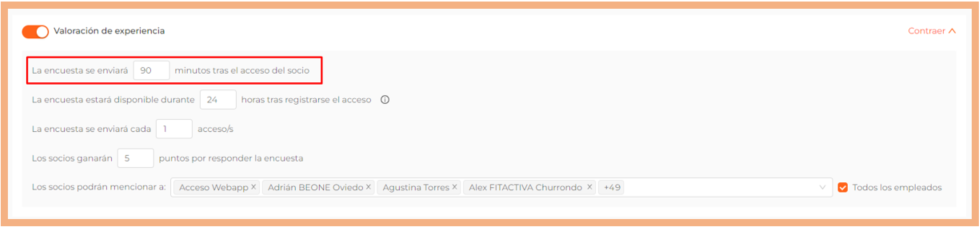
If enabled, you can configure various parameters related to the experience survey that the customer will receive to evaluate how their day at the center was.
-
- The minutes after which the satisfaction survey will be sent following access registration. Maximum of 2 digits.
- The duration for which the satisfaction survey will be available. Maximum of 3 digits.
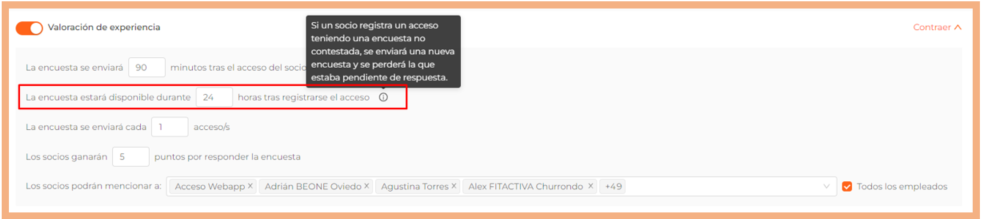
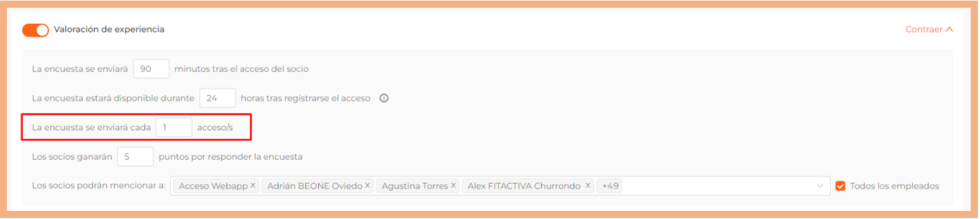
- How often is the experience survey sent out?
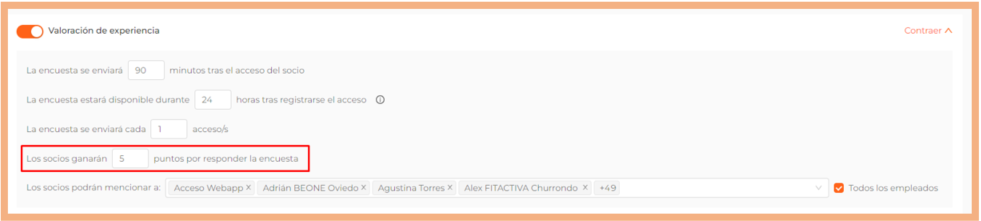
- The number of points customers will receive for completing the survey. Maximum of 2 digits.
- The minutes after which the satisfaction survey will be sent following access registration. Maximum of 2 digits.
-
- The possibility of mentioning employees is offered.
- Click on the dropdown to select the center's employees who will be visible and mentionable by the clients.
- Check the "All employees" box if you want the entire center staff to be visible in the survey.
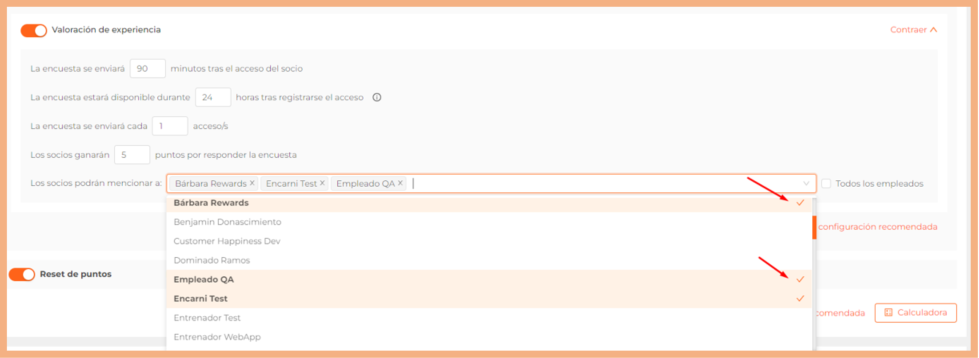
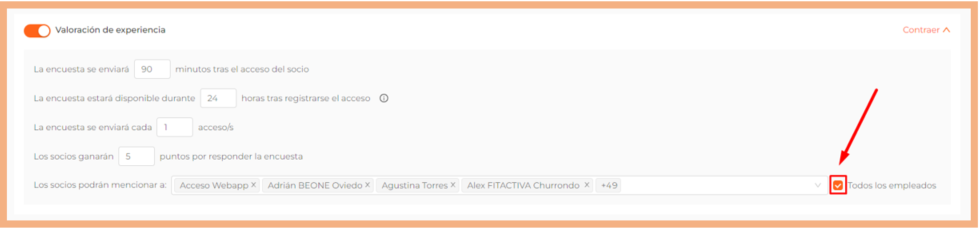
- The possibility of mentioning employees is offered.
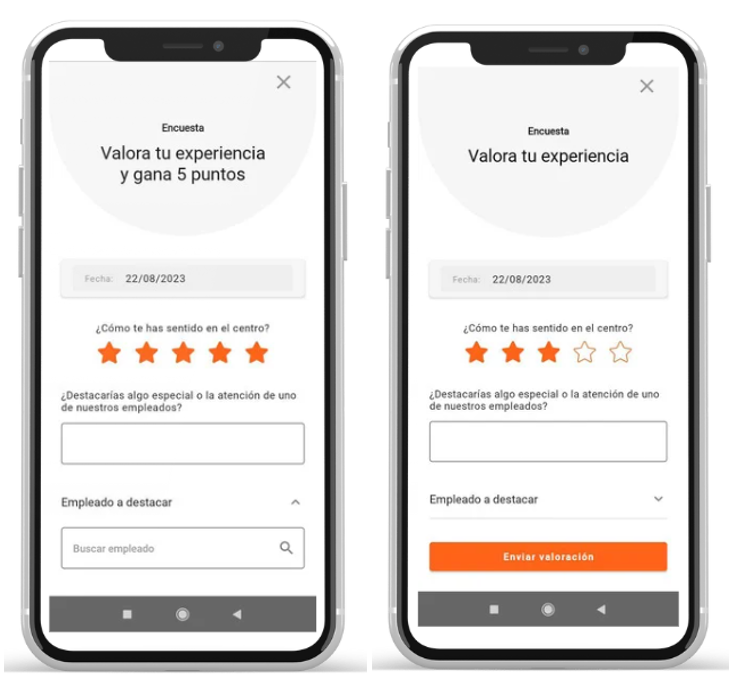
Depending on whether you offer your customers the opportunity to earn points for completing the survey, members will receive the following satisfaction survey to evaluate their experience at the center.
- Apply recommended settings. In each section, you can apply a recommended configuration. By selecting this option for how partners earn points, you can save time in the Trainingym Rewards setup process. After clicking the button, a confirmation message will appear.

Next, you must press the Confirm button to apply the changes.
🚨 ¡Importante!
Press the 💾 Save button to apply any changes made: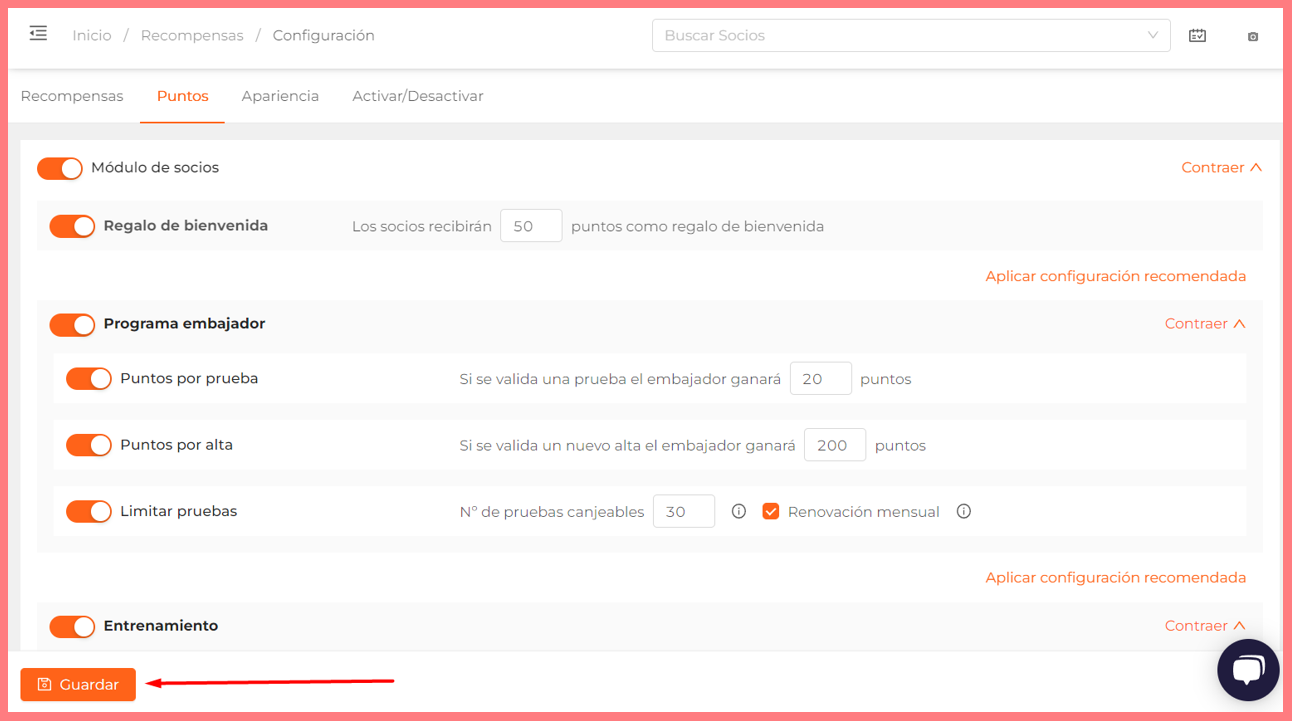
🔹 Análisis Experiencia
El submenú Análisis Experiencia te permite consultar los resultados de la encuesta de experiencia que se envía tras el acceso al centro de los clientes si así se tiene configurado.
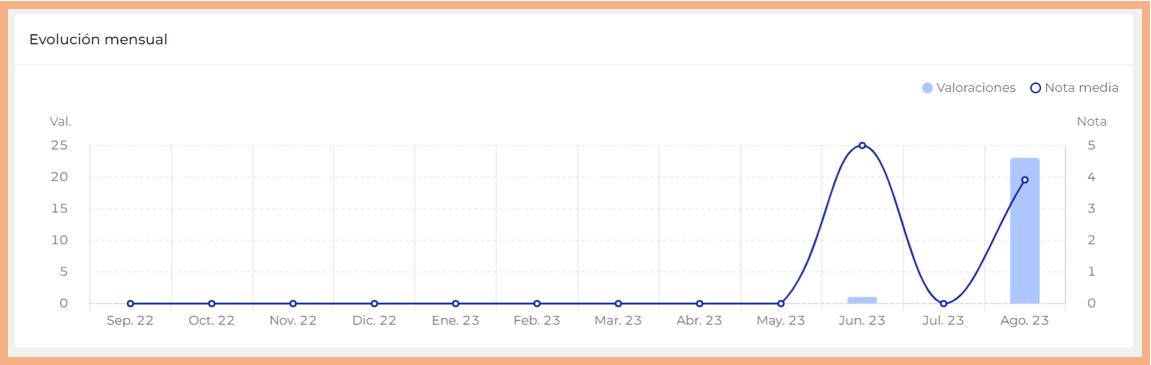
The report allows you to consult daily, weekly, and monthly experiences, enabling you to select the day, week, or month for which you wish to obtain data, displaying:
- Surveys received: total number of experience surveys answered.
- Average rating: average out of 5★ from all surveys answered.
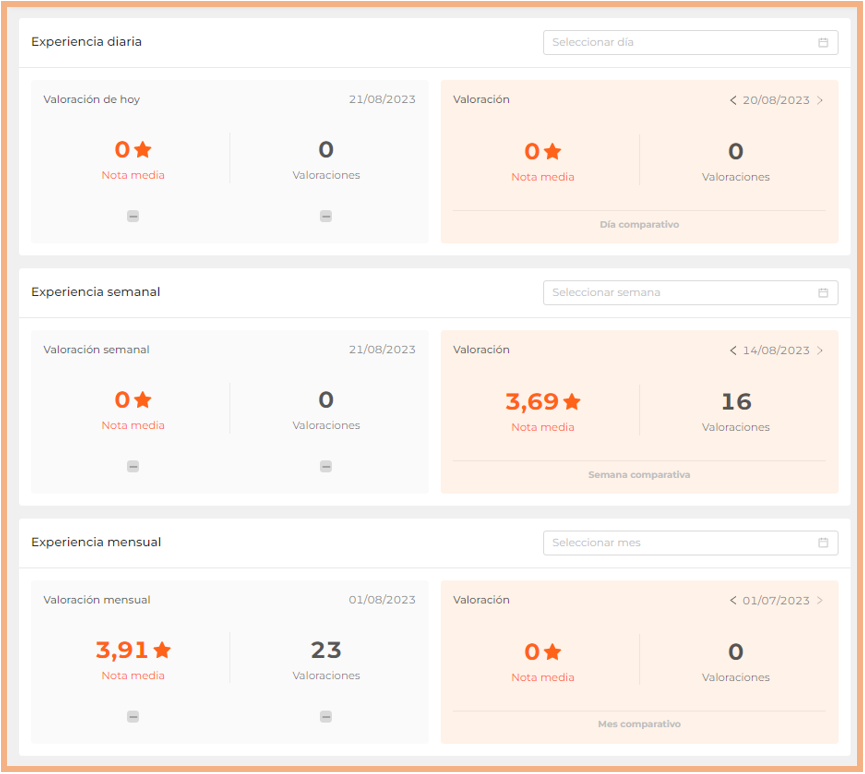
It also includes an Employee Ranking where you can view the number of mentions received and the average rating (out of 5★) for each of them.
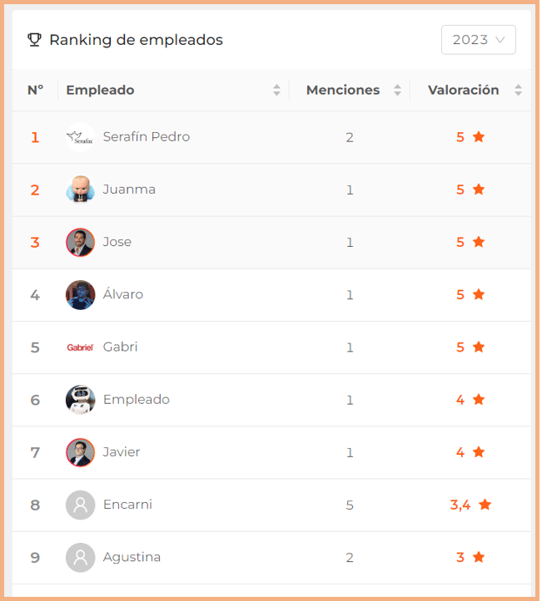
It features a comparative chart of monthly trends.
📌 When ranking employees, only the average "score" obtained from all their evaluations is considered. It is important to note that the number of mentions does not affect the final ranking.
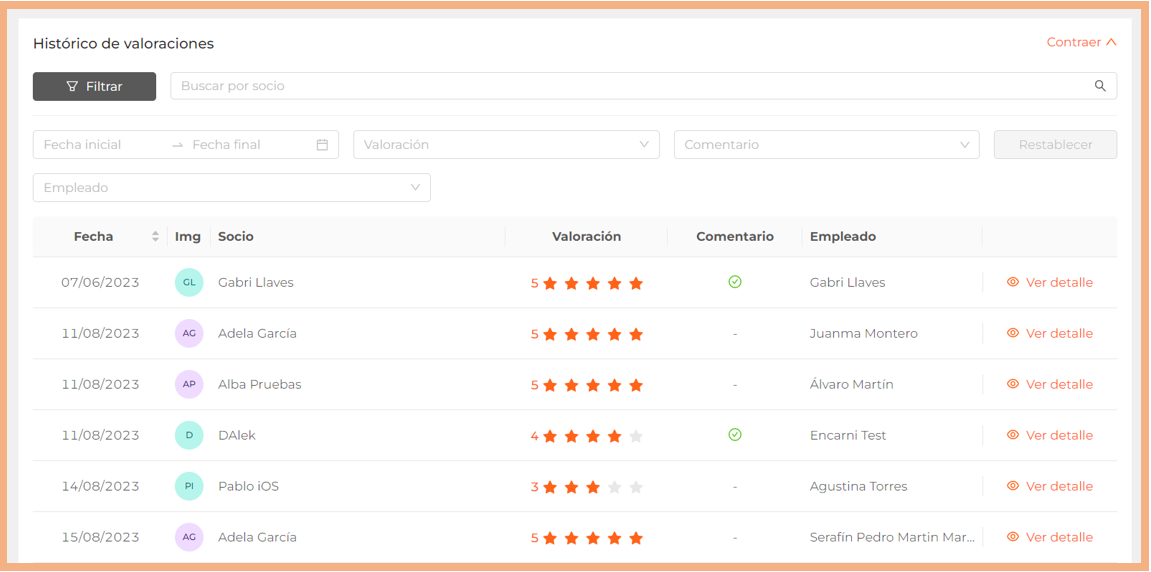
At the bottom, you can display the history of reviews to check customer reviews one by one.
- Filters:
- Search by partner name
- Filter by date range
- By rating (1-5★)
- By comment (If the customer has written a comment in the review)
- By mentioned employee
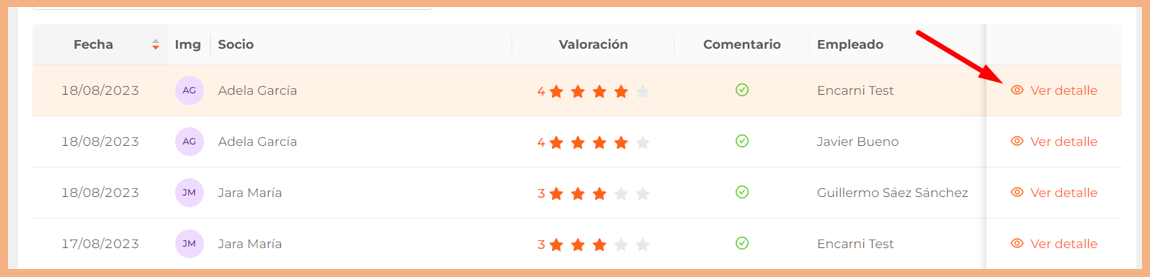
- View details
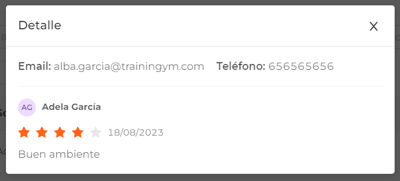
- Customer Email
- Phone Number
- Partner: Full Name
- Date of Evaluation
- Rating (out of 5★)
- Comment (If the customer left a comment in the survey)
- Employee Mentioned
🚨 Important!
To view the "Experience Analysis" section, the Reports > Rewards permission must be enabled.

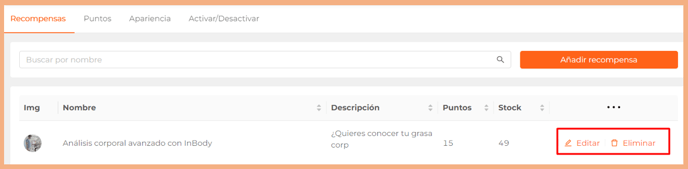
🔹 Rewards.
Here you will find the list of rewards, along with the following options:
- Search bar to locate rewards by name.

-
List of rewards with editable columns through the...

-
- In Image. Always visible, mandatory.
- Name. Always visible, mandatory.
- Description. Maximum visibility of 30 characters. If you hover the mouse over it, the full description will be displayed. Optional visibility.
- Recipient: Members. Optional visibility.
- Points. Optional visibility.
- Quantity. Automatically calculated when the screen loads. Optional visibility.
- Visible: Mandatory. Displays two options (Yes / No) along with the tooltip: ℹ️ “Only visible rewards will be shown to users in the app.”
- Options within each reward:
- Edit. You will be able to modify the fields within the reward configuration screen.
- Delete. The confirmation message ℹ️ "Are you sure?" will appear.
-
Add Reward. Shortcut to add a new reward.


-
- Name. This name is displayed to partners in the app. We recommend using short and concise names.
- Description. This description is shown to partners in the app. We recommend using reward descriptions that are concise and "appealing," focusing on the benefit of redeeming it. Maximum 500 characters.
- Recipient. Select the users for whom this reward will be available.
- Points. Points required to redeem the reward. 👉 ℹ️ If you have doubts about determining the cost in points, you can use the Currency-to-Points calculator.
-
- 🔢 Calculator. After clicking the icon, a calculator modal will open, displaying currency and points:
- The standard conversion rate is 1 point = €0.05.
- The currency will depend on the country of the center.
- Using a conversion database, the currency exchange € → Country's currency will be calculated automatically.
- Example: €0.05 = 0.20 soles, so 1 point = 0.20 soles in a center located in Peru.
- 🔢 Calculator. After clicking the icon, a calculator modal will open, displaying currency and points:

-
-
-
- Save. After pressing the button, the point value will be applied to the reward screen.
-
-
-
- Stock. Number of units available that the partner will see in the app. This data is updated every time the reward is requested.
- Hide when no units are available. If you activate this option, the reward will disappear from the app when the stock is depleted. Otherwise, the reward will still appear but will display "out of stock."
- Image. Supports .jpg, .png, .gif formats.
- Press 💾 Save to create a new reward or save the changes made to an existing one.
- Stock. Number of units available that the partner will see in the app. This data is updated every time the reward is requested.
2. Rewards
Podrás visualizar las recompensas solicitadas por los socios desde la app y web Easy con los siguientes datos y opciones en el listado:
-
-
Filters:
-
Rewards (displays a list of available ones).
- Request date range.
- Search by Member's First and/or Last Name.
Reward status (Requested, Canceled, Delivered, and Returned).
-
- Table columns:
- No member name.
- Last Name of the member.
- Requested reward.
- Redeemed points. - X
- Request date.
- Status: Requested, Canceled, Delivered, and Returned.
-
- Reward options:
- Deliver.
- Cancel.
- Return.
- View history.
- Reward options:

Deliver / Cancel / Return reward
From the rewards list, you can go to Options and select Deliver or Cancel the reward requested by your partners through the Easy app or website.
- Deliver reward. When clicking on Deliver, a confirmation message will appear. Upon confirming:
- The status of the reward will change to ✔️Delivered in the rewards list.
-
The options Deliver and Cancel will be disabled.
-
The Return option will appear among the options (limited by specific permission).
-
- The status of the reward will change to ✔️Delivered in the rewards list.
-
- Cancel reward. After clicking Cancel, a confirmation message will appear. Upon confirming:
- The corresponding points will be returned to the member.
- The reward status will change to ❌Canceled in the rewards list.
- The options Deliver / Cancel / Return will be disabled.
- The operation will be recorded in the different histories.
- In the reward history accessed from the list.
- In the partner's reward history: App and Web Manager, accessible from the list of partners in Trainingym Rewards.
- The requested reward will disappear from the "Today" tab in the app.
- Reward Return. When clicking on Return, a confirmation message will appear: "This reward has already been delivered. Are you sure?". If I confirm the action:
-
The points corresponding to the member will be returned.
-
The status of the reward will change to Returned in the rewards list.
- The options Deliver, Cancel, and Return will be disabled.
-
The operation will be recorded in the historical records.
-
In the reward history accessed from the list.
- In the member's reward history: App and Web Manager, accessed from the Trainingym Rewards member list.
-
Check reward history
You can check the status changes of a reward. To do this, click on the 👁️ View History option or on the status of one of the rewards in the list to see the history of the request changes.


- Operation date.
- Operation: Request / Delivery / Cancellation.
- Employee performing the operation.
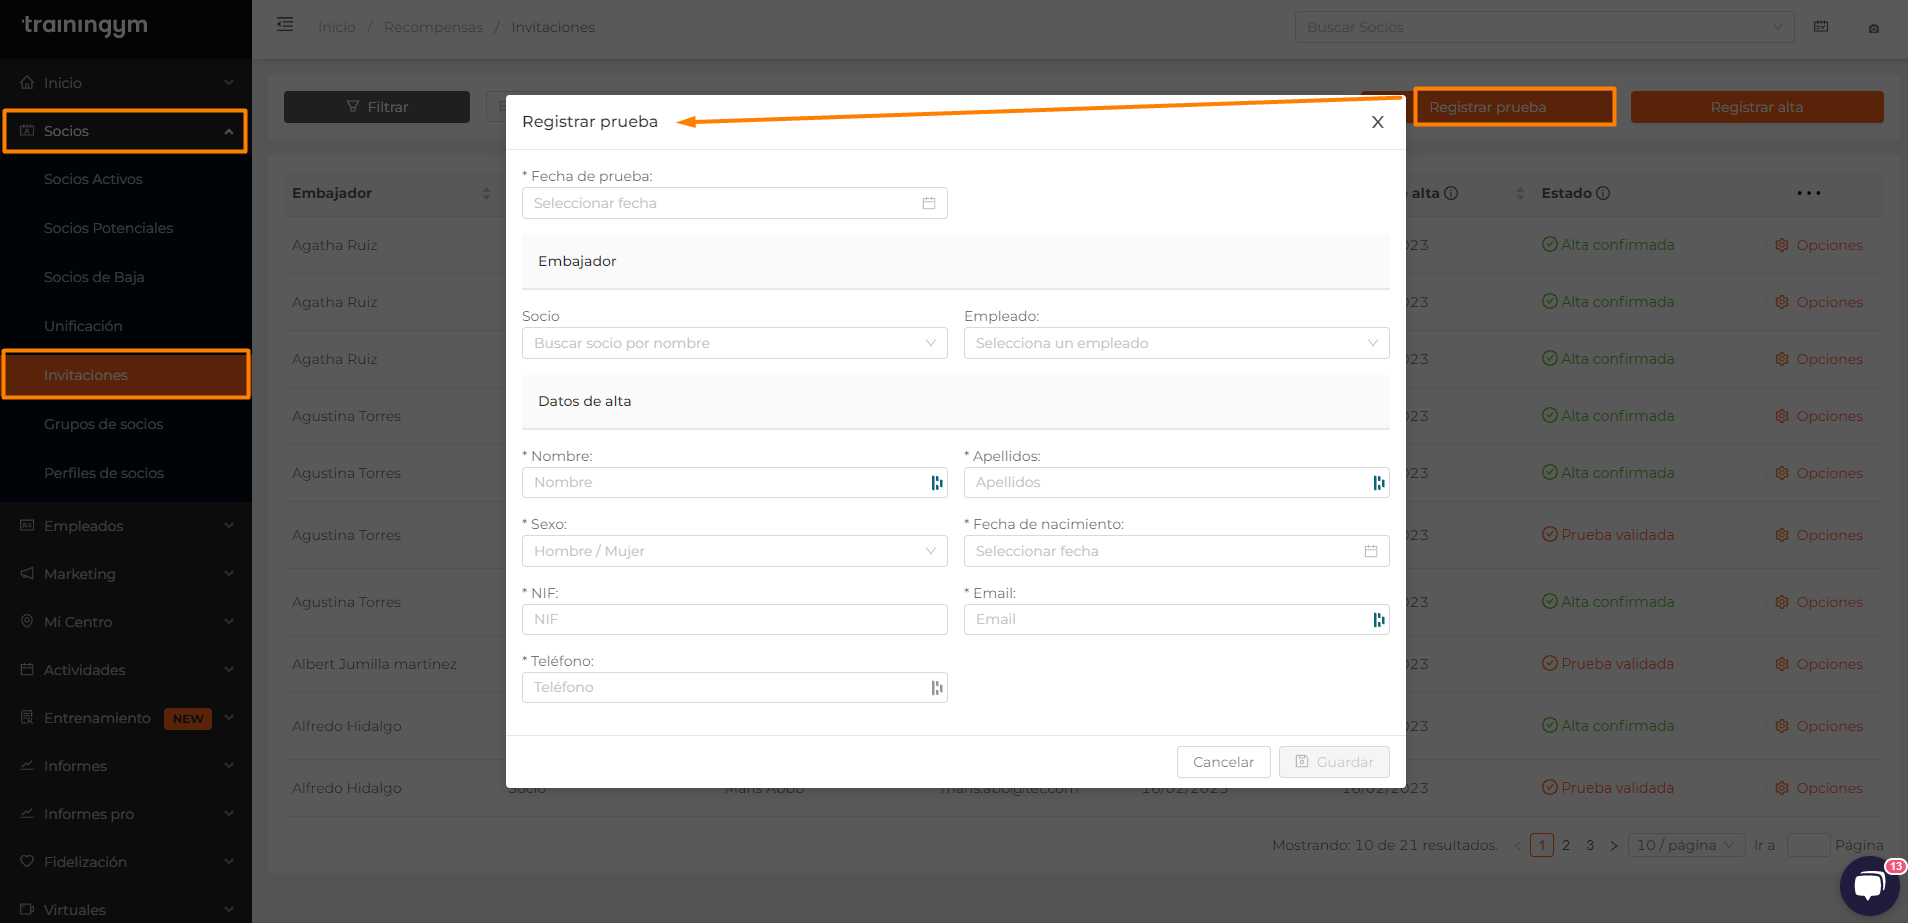
3. Invitations
You can find the list of invitations within the Partners menu, just below the lists of active, potential, inactive, and unified partners.

This list will show you all the tests and approvals sent between partners with the following data and options:
- Search bar by first and last name of members.
- Filter:
- User Type: Member / Employee.
- Status: Validated / Active / Requested.
- Register Test. Direct access to add a test by recommendation (without invitation).
- Register Enrollment. Direct access to add a test by recommendation (without invitation).

- List of tests and approvals sent between partners with editable columns through the ...
-
Ambassador: full name of the member who invites or recommends. Always visible, it is mandatory.
- User type: Member.
- Name of the interested party: full name of the member trying or registering.
- Email of the interested party.
- Phone number of the interested party.
- Date of request: date the trial request form is submitted.
- Trial date: date a trial request is validated by invitation.
-
- Requested: the test has not been validated.
- Validated: the test has been validated.
- Registration: the guest membership registration has been recorded by recommendation.
- Available options in the partners:

-
Validate Test
- Validate Registration
-
View details. Clicking will open a window with the invitation details:Fecha
-
Movement:
-
Test invitation requested: the invited partner has completed the form sent by the ambassador.
- Test invitation validated: the employee has validated the invitation for the partner's visit to the center.
- Activation of test invitation: the employee has validated the activation at the invited partner's center.
-
Guest: Name and surname of the member who is trying or registering.
- Employee who performed the action: Logged-in employee or "automatic."
- Points: Points earned by the ambassador for the guest's trial/validated registration.

⚠️ If the ambassador member is inactive at the center when the potential member fills out the trial form, an error message will appear, and the record will not show up in the list.

Validate test
From the "Trials and Registrations" list, the employee can validate the invitation for the guest member's visit to the center. To do this, they must select Options > Validate Trial and complete the missing information in the window (name, last name, and email are pre-filled from the form):


By clicking Save, an email and ID check will be performed on the entered list of potential members.

-
If one or more potential partners with the same email or ID entered are detected, the system will give us the option to:
- Select a member, unify and record the test. A list of matching members will be displayed, allowing you to select a member.
- Create a new lead and record a test. A new lead will be created.
🔹 Test validation scenarios based on the selected partner:
If one of the "duplicate" partners from the list is selected:
- The new test date will be recorded for the selected member.
- The status will change to ✔️ Validated in the tests and registrations list.
- The ambassador member will receive the corresponding points.
- The ambassador member will see the updated status of their referral in the app.
- The operation will be recorded in the test and registration history, as well as in the ambassador member's points history.
If "Create new potential partner" is selected.
- A new member will be created with the data from the form, with the source "Rewards."
- The status will change to ✔️ Validated in the tests and registrations list.
- The ambassador member will receive the corresponding points.
- The ambassador member will see the updated status of their referral in the app.
- The operation will be recorded in the history of tests and registrations and the ambassador member's points.
Validate registration
🚨 🚨 🚨 Important: If you work with any access control program (ERP: Provis, GPA, SportConsulting...), it is essential to create the client's profile beforehand in the ERP, maintaining the same email and ID number used by the guest in the registration form.
When the client's profile is exported to Trainingym, you can validate their registration from the "Registrations and Trials" list.
From the "Tests and Registrations" list, the employee will be able to validate the member's registration at the center. To do this, they must select Options > Validate Registration and complete the missing information in the window (name, surname, and email are pre-filled from the form):

There are two ways for a referral registration to be completed:
-
Automatic: upon automatically detecting a new member registration (conversion to active) from a potential member whose origin is an invitation from Trainingym Rewards, then:


-
The registration in the list of tests and registrations will be automatically validated, and the operation will be recorded in the history of tests and registrations.
- The corresponding points will be awarded to the ambassador member who sent the invitation, and the operation will be recorded in the member's points history.
- The ambassador member will see their new invitee in the corresponding section of the app.
- Manual Onboarding Validation Process
The employee must select Options > Validate registration and complete the missing information in the window (name, last name, and email are pre-filled from the form). After saving:
- If the guest remains a potential partner, they will become an active partner.
- The invitation status will change to 🏆 Added to the list.
- The ambassador partner will receive points for the addition.
- The ambassador partner will see the updated status of their invitation in the app.
- The operation will be recorded in the history of trials, additions, and the ambassador partner's points.
- The "Validate Trial" option will be deactivated, preventing any trial validation after the addition validation.
Register test request (without invitation) in Trainingym Manager
On the "Tests and Admissions" list screen, you can record tests after completing the form with the following information:
-
Registration date (cannot be later than the current day)
-
Select the inviting partner (ambassador) from the list of active partners.
-
Enter the information of the person interested in trying:
-
First Name:
- Last Name:
- Gender:
- Date of Birth:
- ID Number:
- Email:
- Phone Number:
- After clicking save, a duplicate is detected in the email field with another potential member who has already validated a trial. You will be notified of this, but you can proceed and confirm the action. If you confirm the save action:

-
-
A new potential partner will be created with the data entered in the validation window.
-
The origin of this partner will be marked as "Trainingym Rewards".
-
- It will be marked this way in the list of tests and activations with a message like “Test invitation redeemed.”
-
-
-
The partner who invited will receive the corresponding points for the invitation.
-
Register a new account by recommendation (without invitation) in Trainingym Manager
On the "Tests and Admissions" list screen, you can register admissions after completing the form with the following information:

-
Registration date (cannot be later than the current day)
-
Select the inviting partner (ambassador) from the list of active partners.
-
Enter the data of the interested party to try:
-
First Name:
- Last Name:
- Gender:
- Date of Birth:
- ID Number:
- Email:
- Phone Number:
- After clicking save, a duplicate email field with another member is detected. You will be notified of this, but you can proceed and confirm the action. If you confirm the registration process:
- The new member will be registered as an active member, with the origin "Trainingym Rewards."
- A new row will be created in the test and sign-up list table, including the interaction data, with the status 🏆 Sign-Up.
- The operation will be recorded in the history of tests, sign-ups, and the ambassador member's points.
- The ambassador member will receive points for the sign-up.
- The ambassador member will see the updated status of their invitation in the app.
4. Members List
Through this list, you will see a list of participating Trainingym Rewards members and their points, including all those who accessed the module at least once (viewed the tutorial) with the following data and options:

- Search bar by first and last name of members.
- Filter:
- Editable columns of the member list through the ... In case of modification, the column arrangement will be saved and will load the same way the next time this screen is accessed.
-
Image: Mandatory, loads by default.
- First Name: Mandatory, loads by default.
- Last Name.
- Email.
- Points.
- Available options for partners:
- Add.
- Subtract.
- Reset.
- View history.
🔹 Add, subtract, and reset points manually
You can add, subtract, and reset the points of one or more members by going to Options > Add / Subtract / Reset with the following information:
- Add and subtract points. By clicking on the Add or Subtract button, whether from the list options or after multiple selection, the Add or Subtract Points window will open. In this window, you must indicate:
-
-
-
- Points to add or subtract.
- Reason for adding or subtracting points.
- Confirm.
-
-

Upon completing the addition or subtraction of points:
-
The points change will be reflected in the app for both the member and manager.
- The points change will be recorded in the member's points history.
🔹 Reset points.
When clicking the Reset button, either from the list options or after multiple selections, a window will open with the message: "This action is irreversible and will reset the member's points to 0. Are you sure?"
Upon completing the Reset operation:
-
Point changes will be reflected in the app for both the member and the manager.
- The point change will be recorded in the member's point history.
🔹 Check the member's points history
You can access a detailed history of any member's transactions by navigating to Options > View History with the following data:


-
Date.
-
Event | Detail:
-
Welcome Gift.
- Request / Invitation Validation | Guest's full name.
- New Member Validation | New member's full name.
- Request / Cancellation / Reward Return | Reward name.
- Manual Points Addition / Deduction / Reset | {reason provided by employee}.
- Validated Activity | {activity name}.
- Validated Routine Session | Routine name.
- Validated Virtual Session | Virtual session name.
- Survey Completed | Survey name: activity evaluation, services, instructor...
-
Points: points earned or deducted.
-
Employee: only where applicable (manual point addition/service survey).
-
You can export the member's points history in Excel 💥 through the ...

5. Reports. Check the Trainingym Rewards KPIs
As a fitness employee, you can check the main performance indicators related to Trainingym Rewards by navigating to the menu Reports > Rewards.
-
Test Requests.
-
Validated Tests.
-
Referrals Added.
-
Conversion Rate %.
The report will be displayed in a General or Detailed view (exportable to Excel) and will be updated every 24 hours.

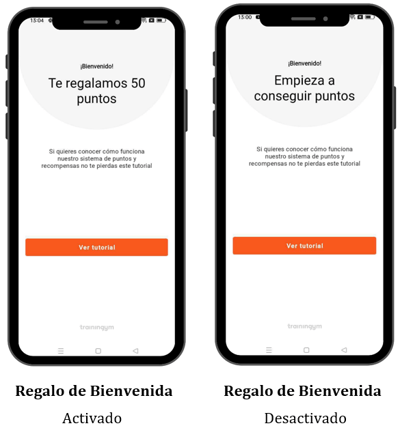
6. What will your customers see on their first access after activating Rewards?
The first screen after the initial login will depend on whether the Welcome Gift module is active.
-
-
If you have the Welcome Gift, your customers will see the welcome gift screen in the app (more info).👉🏻 here).
-
If the Welcome Gift is not active, your customers will see "Start earning points."
-

Receive Welcome Points
If the Welcome Gift module is active, your customers will see the following screen:

HOME Rewards Screen
After the tutorial, or if you click on the Rewards menu from the My Center tab in the app, you will access the Rewards home screen, where you will see the following options:
- Points earned
-
Invite and earn. Link to share invitations.
-
Redeem your points for rewards. Access the list of available rewards.
-
Check the status of your referrals. Access the list of referrals.
-
View points history. History of earned points.
-
How to earn points? Access the Rewards tutorial.
-
The visibility of the components on the home screen will depend on the active modules in the Settings menu.

7. Have you received a free trial invitation for a fitness center and don't know what to do?
First, click on the URL provided by the active partner who sent you the invitation. You will be directed to a web form where you can enter your information and submit your trial request.
- Data to be filled in:
-
Required: First name, Last name, Email.
- Optional: Phone number.
🎉 Congratulations! You can now enjoy a trial at your favorite center.