Recurring class bookings are now incredibly easy. Save time and build customer loyalty with Trainingym's Recurring Booking Manager.
What advantages does the Trainingym Recurring Booking Manager offer you? 🧐
- Maximize your time in the simplest way possible.
- Retain your customers by reserving spots for them in their favorite classes.
- Maximize the profitability of your guided classes.
- Improve your customer attendance.
- Offer a unique experience to your clients as a complementary service in their fee.
What content will we cover in this tutorial?
1. How to schedule a new directed class with recurring bookings for one or multiple clients.
2. How to clone reservations from an already scheduled class in your timetable.
3. Clone members with reservations in paid activities.
4. Cancel recurring reservations
Here, we explain everything to you step by step.
1. Cómo programar una clase dirigida con reservas recurrentes para uno o varios clientes.
First, log in to Trainingym Manager with your username and password. Then, go to the menu. Activities > Manage schedule.
Click the "Schedule Activity" button to create the timetable for a new class.
Next, a pop-up window will allow you to configure all the parameters of the class you want to set up from the "Configuration" section.
👉 The fields you need to fill out are as follows. Fields marked with an * are mandatory.
- * Activity. Select a class from the dropdown menu. The available options depend on your List of activities. If you need to create new activities, review this tutorial. 👉
- * Room. Select the space where the class will be held. The available options depend on your list of rooms. If you need to create new rooms, review. 👉 este tutorial
- * Total seats. By default, it auto-fills with the capacity of the selected room in step 2, but it is editable. This information will be useful in the activity report to obtain an indicator such as the % of actual attendance versus capacity.
- * Effort level. Select the difficulty level for the scheduled class.
- Employee. Select the employee responsible for teaching the class.
- * Target (goal). Determine the desired attendance goal for the class. Regarding this indicator, we recommend setting a "realistic" target initially. This data will be useful in the activity report to obtain an indicator such as the % of actual attendance vs. target.
- * Period: Select the start and end date for when the class will be held. Once saved, changes are NOT allowed.
- * Time. Select the start time of the class.
- * The days repeat. Select which day(s) of the week the class will be held.
- * Duration: Set the scheduled class duration in minutes.
Additionally, you can configure the following options:
- Reservation settings.
- Reservable. By selecting this option, the seat option will open to determine the number of reservable seats through the App and Web. Additionally, selecting this option (Reservable) will enable the "Reservations" section.

- Reservable. By selecting this option, the seat option will open to determine the number of reservable seats through the App and Web. Additionally, selecting this option (Reservable) will enable the "Reservations" section.
Before "Saving" the data for the class you are scheduling, go to the "Reservations" section to include the bookings for the clients you want to guarantee a spot in the class you are scheduling.
👉 Steps to follow to include a reservation are:
- Search for the client you want to make a reservation for by name and/or email using the "Search member by name" field.

- Once located, click the "Assign Reservation" button.

- Repeat this process for each client you want to assign a reservation to in the class you are scheduling. You can remove a reservation at any time by clicking the "Delete" button.

- To finish, return to the "Settings" section of the pop-up window to "Save" the changes.

- Check how, within the scheduled class date range, the reservations made during the setup process have been correctly saved.

2. How to clone bookings from an already scheduled class in your timetable.
Once you have logged into Trainingym Manager, go to the menu Activities > Manage Schedule.
Next, access the schedule of the class where you wish to include new reservations for your clients.

Once you have added the new reservations, select the class in the schedule and click the "Clone members with reservation" button.
Next, a window will appear where you must address two important questions, both mandatory.
📌 Note
At the top of the screen, the total number of scheduled events for the selected activity will be displayed.

- For which events? Decide whether the reservations will be cloned for all Crossfit activities on Mondays at 9:00 AM scheduled from the selected date until the end of the programming period, or if you want to clone the reservation within a specific date range.
- For all future events of this series.
- Between dates.
📌 Note
To check the date range for a scheduled class in your timetable, go to the "Settings" section within the class schedule and look at the "Period" field.

🚨 Caution
The different times at which a class is scheduled in your timetable may have various scheduling periods.
- For which partners? Decide whether the reservation cloning will affect all reservations within the selected activity or only the selected reservations.
- For all members.
- In a personalized manner

Finally, click on the "Confirm" button.

❗ Warning
Currently, the option to clone reservations is not available within the "Multiple Edit" feature. Therefore, the process must be done class by class.
3. Clone members with reservations in paid activities.
Now, this feature will also allow you to clone your customers' bookings for paid activities, deducting the sessions from their products and eliminating the need for you to perform this operation manually.
Here's how it works:
We have a paid activity for which we want to clone our customers' reservations.
- We manually enter our clients' reservations from Trainingym manager or request our clients to book through the personalized EASY app or website.
- Select the activity and click on the "Clone members with reservation" button.

-
Next, a window will appear where you must respond to two important questions, both mandatory.
📌 Note
The total number of scheduled events for the selected activity will be displayed at the top of the screen.

- For which events? Decide whether to clone reservations for all Crossfit activities scheduled on Mondays at 9:00 AM from the selected start date to the end date of the schedule, or if you wish to clone the reservation within a specific date range.
- For all future events in this series.
- Between dates.
📌 Note
To check the date range for when a class is scheduled in your timetable, go to the "Settings" section within the class schedule and check the "Period" field.

🚨 Caution
The different times at which a class is scheduled in your timetable may have various scheduling periods.
- For which partners? Decide whether the cloning of reservations will affect all the reservations within the selected activity or only the selected reservations.
- For all members.
- In a personalized manner

Finally, click on the "Confirm" button.

❗ Warning
Currently, the option to clone reservations is not available within the "Bulk Edit" feature. Therefore, the process must be done class by class.
- For which events? Decide whether to clone reservations for all Crossfit activities scheduled on Mondays at 9:00 AM from the selected start date to the end date of the schedule, or if you wish to clone the reservation within a specific date range.
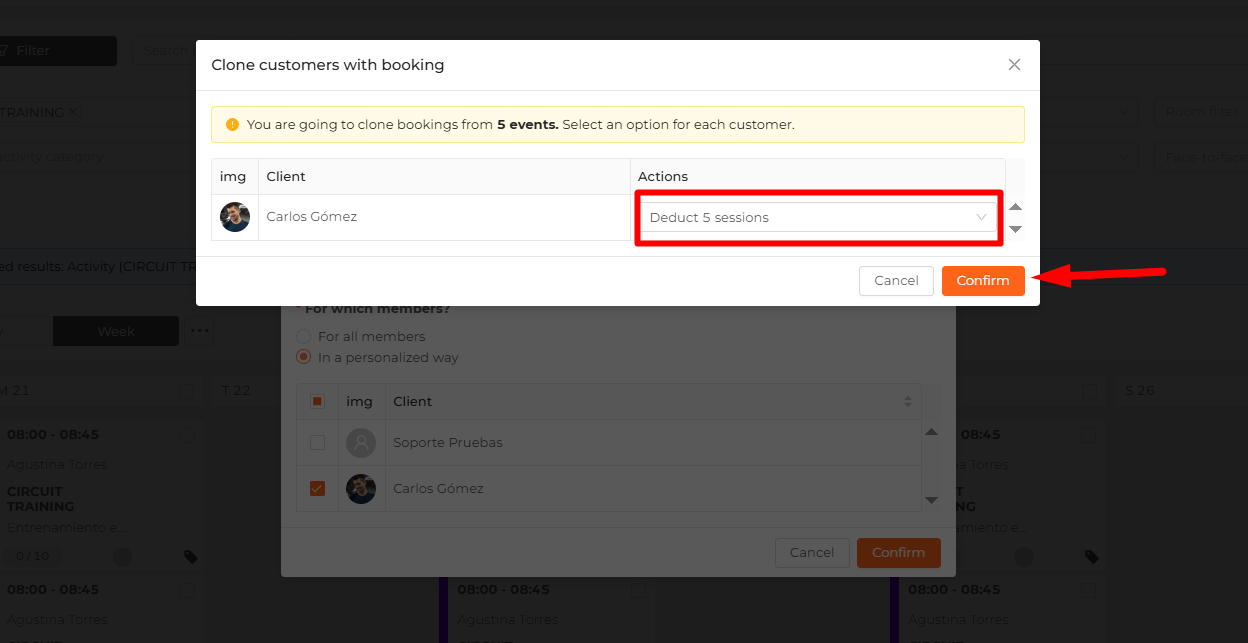
- After confirming, a new modal will allow you to choose which action to perform from the following options:
-
- Reserve, deducting the sessions from any of the products contracted by the client.
- Reservar los eventos gratis.
- Finish without duplicating the reservations for the selected customer.


- Select the desired action for each client and click the "Confirm" button.
❗ Warning
If the product contracted by the client is a voucher with an expiration date, it will not be shown as an available option to deduct sessions if future events exceed the voucher's expiration date.
📌 Note
Remember that if a client cancels their subscription and has future reservations, those reservations will be removed within 3 days.
4. Cancel recurring reservations
Just as you have cloned members' reservations for a series of activities, you may also need to cancel those reservations if the member has changed the day or prefers another activity. To do this, follow these steps:
1. Access the activity and select the partner.

Click on Cancel Reservation.

You will see a notification indicating that the reservation is part of a series of events, and you can choose to cancel just that activity or that one and all related ones. In this case, you would need to select "Cancel all related."

Once confirmed, a pop-up window will appear confirming the cancellation of the recurring reservations.
